OUR VIDEOS GALLERY MEMBER SPONSORSHIP VENDOR SPONSORSHIP

User Tag List

Results 1 to 10 of 10

Thread: Being charged a small fortune so want to install myself UHF, Boost and Exhaust gauge

  1. #1
    Advanced ImRobboToo's Avatar
    Join Date
    Sep 2015
    Location
    Great Southern, Western Australia
    Posts
    88
    Thanks
    27
    Thanked 27 Times in 13 Posts
    Mentioned
    0 Post(s)
    Tagged
    0 Thread(s)

    Being charged a small fortune so want to install myself UHF, Boost and Exhaust gauge

    and more.

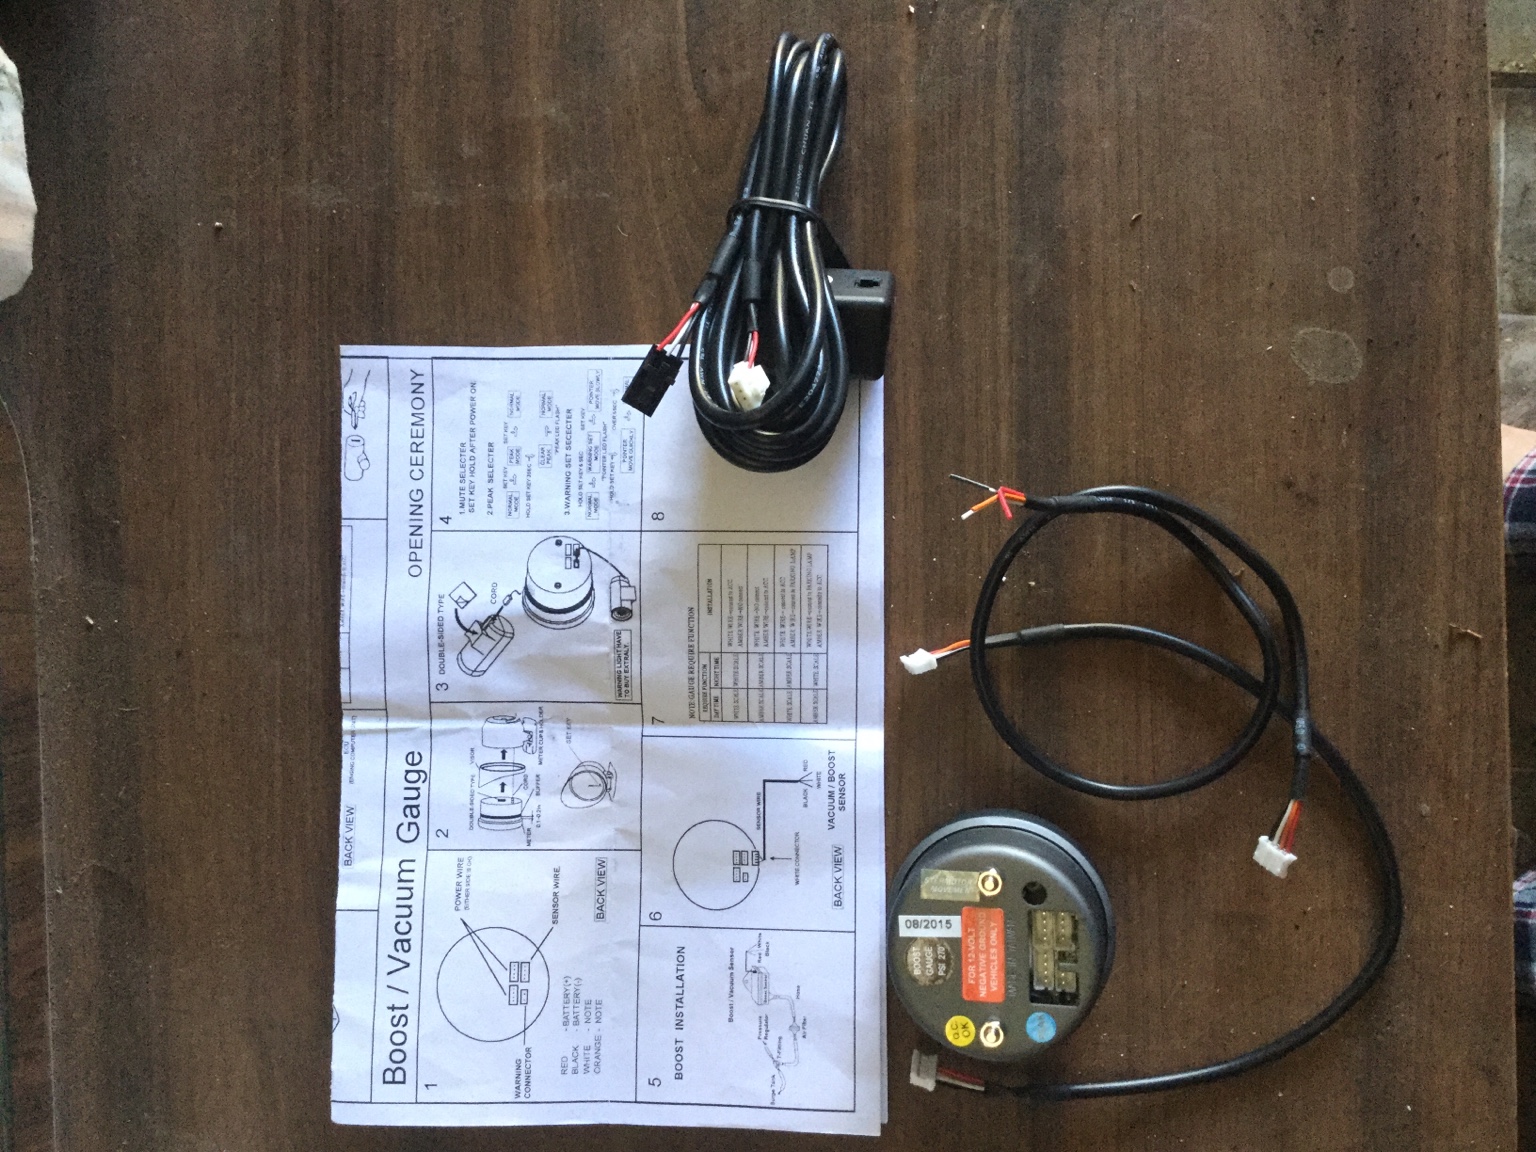
    I went down to the only Auto Sparky in town, and he said minimum of $750 to install Boost/Exhaust gauges, RedArc Dual battery, UHF and plug for fridge in back and Anderson plug (I think he was pissed that I bought all the hardware online). . I want to try this myself, but it comes down to finding live power under the dash for me. I'm pretty sure I can install both gauges myself, it is the issue of finding constant and on/off power for both gauges . . Is there a diagram or a walkthrough on here anywhere ??

    I have both the gauges in the Race Tech branding if that helps ?? Appreciate any help what so ever. . . Cheers
    Arguing with a Zealot, is only slightly easier than tunnelling through a mountain with your forehead !!!

  2. #2
    Legendary 4bye4's Avatar
    Join Date
    Aug 2014
    Location
    Kingsley WA
    Posts
    4,856
    Thanks
    1,077
    Thanked 2,537 Times in 1,299 Posts
    Mentioned
    15 Post(s)
    Tagged
    1 Thread(s)
    You can get live power from your under dash fuse box. I have my UHF and somthiong else fed from these. This one from Jaycar but they are available on line from other places.
    http://www.jaycar.com.au/Passive-Com...e-Tap/p/SF5125
    2005 GU IV ST 3.0. Snorkel. Roof rack. Awning. Spots. Welded I/C. Dual batteries & VSR. UHF. Barn door hinge extension. Roof top spot lights. Rear drawers. 2" lift. NADS. EGT and boost gauges. Trans temp and water temp gauges. Provent 200 catch can. Rear ladder


    And crawling on the planet's face, some insects called the human race. Lost in time. And lost in space... and meaning.

  3. The Following User Says Thank You to 4bye4 For This Useful Post:

    ImRobboToo (5th October 2015)

  4. #3
    I am he, fear me the evil twin's Avatar
    Join Date
    Jun 2010
    Location
    W.A. (wandering aust)
    Posts
    6,208
    Thanks
    904
    Thanked 6,642 Times in 3,288 Posts
    Mentioned
    44 Post(s)
    Tagged
    1 Thread(s)
    If you use those "piggy back" doova's make sure you fit them the correct way around.

    The leg common to both fuses has to go in the supply side of the existing fuse holder.

    If you get it the other way around it means the current for both accessories flows thru the 'original fuse' and you can get some weird issues of random fuse blowing and one fuse takes out both accessories etc
    Dolphins are so smart that within a few weeks of captivity, they can train people to stand on the very edge of the pool and throw them fish.

  5. The Following User Says Thank You to the evil twin For This Useful Post:

    ImRobboToo (5th October 2015)

  6. #4
    Advanced ImRobboToo's Avatar
    Join Date
    Sep 2015
    Location
    Great Southern, Western Australia
    Posts
    88
    Thanks
    27
    Thanked 27 Times in 13 Posts
    Mentioned
    0 Post(s)
    Tagged
    0 Thread(s)
    Ok cool. forgive me if it sounds simple, and I probably already know the answer, but I would use 2 of these for power for say the UHF then ?? or would one of these do it for is power ?

    If that is constant power, for say Memory in the gauges for warning Light, what would I use for ignition on/off power ??
    Arguing with a Zealot, is only slightly easier than tunnelling through a mountain with your forehead !!!

  7. #5
    Legendary 4bye4's Avatar
    Join Date
    Aug 2014
    Location
    Kingsley WA
    Posts
    4,856
    Thanks
    1,077
    Thanked 2,537 Times in 1,299 Posts
    Mentioned
    15 Post(s)
    Tagged
    1 Thread(s)
    One for each device. Like for my UHF I just removed the fuse for the radio and plugged this doova (thanks ET) in. Then you plug the original fuse into a spot on the doova. Then you have a second fuse feeding the red wire coming off the doova. This one you wire you connect to what you want to power, say your UHF and then put a fuse in connecting the power. You use one for each device you want to run and the return side is via earth or the chassis.
    For the gauges you would have to refer to the diagram that comes with them. If you need +ve to the gauge you should be able to pick it up from the fuse box like the other feed. Use a seperate piggy back for each device. You can get ignition from the fuses marked Acc or the cig lighter feed. Basicly anything that comes on when you turn the ign on.
    You can't pick up the dimable lights on the fuse box.
    2005 GU IV ST 3.0. Snorkel. Roof rack. Awning. Spots. Welded I/C. Dual batteries & VSR. UHF. Barn door hinge extension. Roof top spot lights. Rear drawers. 2" lift. NADS. EGT and boost gauges. Trans temp and water temp gauges. Provent 200 catch can. Rear ladder


    And crawling on the planet's face, some insects called the human race. Lost in time. And lost in space... and meaning.

  8. The Following User Says Thank You to 4bye4 For This Useful Post:

    ImRobboToo (6th October 2015)

  9. #6
    Advanced ImRobboToo's Avatar
    Join Date
    Sep 2015
    Location
    Great Southern, Western Australia
    Posts
    88
    Thanks
    27
    Thanked 27 Times in 13 Posts
    Mentioned
    0 Post(s)
    Tagged
    0 Thread(s)
    Quote Originally Posted by 4bye4 View Post
    One for each device. Like for my UHF I just removed the fuse for the radio and plugged this doova (thanks ET) in. Then you plug the original fuse into a spot on the doova. Then you have a second fuse feeding the red wire coming off the doova. This one you wire you connect to what you want to power, say your UHF and then put a fuse in connecting the power. You use one for each device you want to run and the return side is via earth or the chassis.
    For the gauges you would have to refer to the diagram that comes with them. If you need +ve to the gauge you should be able to pick it up from the fuse box like the other feed. Use a seperate piggy back for each device. You can get ignition from the fuses marked Acc or the cig lighter feed. Basicly anything that comes on when you turn the ign on.
    You can't pick up the dimable lights on the fuse box.
    Of course, Earth. See I did know, but needed a jog.

    Thanks again, for your knowledge and insight. Will see how we go.


    Tapping it out . . .
    Arguing with a Zealot, is only slightly easier than tunnelling through a mountain with your forehead !!!

  10. #7
    Beginner
    Join Date
    Jul 2015
    Location
    Adelaide
    Posts
    24
    Thanks
    16
    Thanked 12 Times in 6 Posts
    Mentioned
    0 Post(s)
    Tagged
    0 Thread(s)
    Do you know where you are plumbing your boost gauge into yet? I am looking at doing mine on my own soon but am used to petrol turbo and having spare ports on the intake manifold.

  11. #8
    Patrol Freak Bigcol's Avatar
    Join Date
    Sep 2010
    Location
    Swan Valley Perth
    Posts
    1,479
    Thanks
    1,028
    Thanked 541 Times in 387 Posts
    Mentioned
    11 Post(s)
    Tagged
    0 Thread(s)
    while buying stuff on line, or at your local auto place
    get some 8mm or 10mm ( I dont know this B&S crap in wiring size - Bachelor & Spinster is the only B&S I know)
    also get an 80Amp fuse and holder
    put the fuse holder on your 2nd battery (if you have one) and run the cable to the back of the car - put in your plug for fridge & whatever

    bobs your uncle

    I ran 10mm to a fuse box on my cargo barrier, then 8mm to both my fridges and other things

    I also ran 10mm cable to the rear for my Anderson plug for my Van
    Tidy Whitey - 99 GU TD42Ti - Diesel Gas, (GUIV Turbo & Intercooler 8Lb boost), 33" Micky T's Baja MTZ's, Dual Batt's, Cargo Barrier, rear draws, HID Super Oscars, winch, Grinch & witch attached and more goodies to come

  12. The Following 2 Users Say Thank You to Bigcol For This Useful Post:

    ImRobboToo (6th October 2015), Winnie (6th October 2015)

  13. #9
    Advanced ImRobboToo's Avatar
    Join Date
    Sep 2015
    Location
    Great Southern, Western Australia
    Posts
    88
    Thanks
    27
    Thanked 27 Times in 13 Posts
    Mentioned
    0 Post(s)
    Tagged
    0 Thread(s)
    Quote Originally Posted by Shazlic View Post
    Do you know where you are plumbing your boost gauge into yet? I am looking at doing mine on my own soon but am used to petrol turbo and having spare ports on the intake manifold.
    When looking from front of engine bay, you plumb the vacuum pipe into the the top most, front most pipe coming out of the inter cooler. The images I have seen, have them coming out of the fist elbow you see. Don't ask for tech speak from me

    Quote Originally Posted by Bigcol View Post
    while buying stuff on line, or at your local auto place
    get some 8mm or 10mm ( I dont know this B&S crap in wiring size - Bachelor & Spinster is the only B&S I know)
    also get an 80Amp fuse and holder
    put the fuse holder on your 2nd battery (if you have one) and run the cable to the back of the car - put in your plug for fridge & whatever

    bobs your uncle

    I ran 10mm to a fuse box on my cargo barrier, then 8mm to both my fridges and other things

    I also ran 10mm cable to the rear for my Anderson plug for my Van
    Thanks Col. That would be quite easy one. I just need some guidance is all

    Now, for those that have installed. Couple of questions. From the image below, I have 3 wires.
    One from Sender to Gauge (that's the easy one) then I need power and and for the warning. The Power I'm guessing is the one with the exposed wires ?? Why 4 wires, and which is which ?? This is where a sparky would know what's what ........
    The other wire has connectors in each end ??

    Now in the diagram, the warning has a very small 2 pronged plug but none of the wires I have have them ??
    What's the small wire with connector each end ??

    You all said ask questions, so now you are stuck with me haha


    One more, in the diagram, it has the tube going to the Pressure Regulator ( I'm guessing this is the thing on the Turbo where the Dawes hooks into) and the other end the surge tank. The surge tank is the pipe I plumb into ??

    Now they aren't very thick walls on the pipe, so what's the best way to do this ?? Hole, tap it, screw something in with plumbing tape ??

    The hard thing, is we don't have a auto car place in my small 5000 peeps town, so I will have to work with what I have.

    Bare with me, I'll be done in a couple of weeks lol


    Tapping it out . . .
    Arguing with a Zealot, is only slightly easier than tunnelling through a mountain with your forehead !!!

  14. #10
    Patrol God threedogs's Avatar
    Join Date
    Jun 2012
    Location
    Melb
    Posts
    31,634
    Thanks
    10,350
    Thanked 9,963 Times in 7,394 Posts
    Mentioned
    113 Post(s)
    Tagged
    2 Thread(s)
    Install your dual battery system first IMO then run some decent cable down the back , fused of course.
    These redarc power outlets are great if you dont have a drawer system,
    For the UHF I'd run that off the aux battery as well if its needed as a home base radio
    .
    Thats your rear power needs sorted.
    You already have the boost gizmo .
    Attached Images Attached Images
    04 ST 3lt auto, not enough Mods to keep me happy, but getting there

Posting Permissions

  • You may not post new threads
  • You may not post replies
  • You may not post attachments
  • You may not edit your posts
  •