Cuppa I think I will need you to cut one out for me and post it over, I can cover it and screw it together, that's about the only way I will get mine done. Btw looks great!


Cuppa I think I will need you to cut one out for me and post it over, I can cover it and screw it together, that's about the only way I will get mine done. Btw looks great!

Yeah right! Dream on mate!Originally Posted by Stropp

I had under estimated how much stuffing around is involved. Today I reckon I've spent another 3 hours just 'adjusting' things (cutting, drilling, sanding) to get the whole thing to sit right with the two screw on sections in place. Plus the top four screws which hold the original glovebox on were pushing up the bottom of the new one. All sorted now but enough of a hassle to make it a definite one off! And things could still go pear shaped whilst covering it with fabric ..... & I haven't even started on the door yet!
Cuppa
2006 4.2TDi ex-Telstra Remote area Camper. Patrol Sold after 11 years of ownership Replaced with 2006 OKA NT Expedition Truck. Cummins, Allison & lots of goodies
A Nomadic Life (Blog)
Stropp (28th May 2013)


Thats IT!!! I now have to rip mine out and start all over again...
Stopp. Once you get started its not really that hard to do. It's just starting it is the issue. Getting over the nerves of cutting into your dash. But once that first cut is done you get more into it as you can't turn back after that.
Stropp (28th May 2013)
LOL.
Agreed it's not hard, but it is fiddly & time consuming ....... but we all need things to keep us occupied eh?
2006 4.2TDi ex-Telstra Remote area Camper. Patrol Sold after 11 years of ownership Replaced with 2006 OKA NT Expedition Truck. Cummins, Allison & lots of goodies
A Nomadic Life (Blog)


@ Cuppa Flat pack one here too please
Meaning all we need is dimentions of all the pieces
to glue and screw together. like blue prints.
No point 8 ppl doing 8 different sizes
Me I'd be fibre glassing all that now and giving it a final shaping [sand]
Edited again is it 9 odd pieces I counted
Last edited by threedogs; 27th May 2013 at 05:22 PM.
04 ST 3lt auto, not enough Mods to keep me happy, but getting there
TD, ya gotta understand the way in which I work! I make it up as I go along..... except in this instance I've borrowed heavily on Mudski's previous & documented experience. I could measure up all the pieces of cardboard I had for the mock up, I could even reproduce them on card or similar........ but they would be of no help to anybody because since cutting out the shapes & fitting them together, most of them have been altered again.... And they don't come apart.
And ya gotta learn to count ...... there's 13 pieces.(14 if you include the packing piece) ..... & that doesn't include the piece of auminium angle I cut but forgot to use 'cos i'd already glued & nailed before I found it laying in the foot well .
As for fibreglassing, I'll pass ................ & wait to see what you can come up with.
Cuppa
2006 4.2TDi ex-Telstra Remote area Camper. Patrol Sold after 11 years of ownership Replaced with 2006 OKA NT Expedition Truck. Cummins, Allison & lots of goodies
A Nomadic Life (Blog)
Would've been a starting place but no biggie, there has to be a product out there similar to POR15 that you can brush over the lot
or varnish and spray with Chook shite. Carpet to me is for Hot rods Still ok but has to be some product out there.
Did alright on my guzintas and take aways too
04 ST 3lt auto, not enough Mods to keep me happy, but getting there
^^^^^^
This.
Same as mine. Even with the sizes it gets altered here and there. Even do what I did cuppa and write the measurements on the wood and take photos. Then people can make their own judgement. As for fibre glassing. A bit too far I reckon. Especially if your going to line the inside of it. Thats why mine looked like a dog's breakfast without the carpet lining. With the lining it looks almost factory. Who cares what it looks like from behind, you won't see it. You don't look at the mantle piece while your stoking the fire...
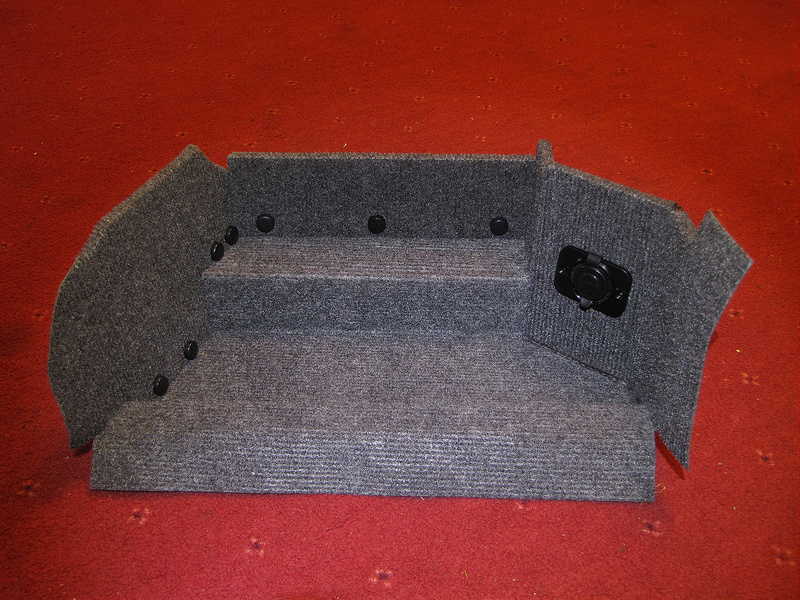
I should've used the carpet rather than the thinner 'Spotlight' fabric. Being thin wasn't the issue, but rather the fact that it's surface has a raised parallel rib pattern meaning that far more care is required to get things sitting right. Easier said than done on a complex 3D shape. I wasn't born to be an upholsterer (or a dressmaker)! Took me most of the day stuffing around with this (in between herding sheep with newborn lambs around which is only slightly easier than herding cats). I'm reasonably happy with the result, although the black screw caps are more prominent on the fabric than I'd hoped. There will be another 3 at the back when the box is fitted in place which unfortunately don't line up the others. Maybe I'll do without the black caps? If doing it again (which I won't be) I'd choose black rather than 'Charcoal'covering. There is a lip at the front of the rear shelf, but it's hard to see in the pic. Socket is a USB port for charging the iPad.
Flaps of fabric at bottom front & sides are to be finished once box is installed.
Cuppa
2006 4.2TDi ex-Telstra Remote area Camper. Patrol Sold after 11 years of ownership Replaced with 2006 OKA NT Expedition Truck. Cummins, Allison & lots of goodies
A Nomadic Life (Blog)
FNQGU (17th January 2014)
Try the local upholsterer/trimmer for offcuts. That is literally how much you will use. Potentially free as well.
 Posting Permissions

 Reply With Quote