-
17th August 2010, 09:20 PM
#1
Patrol Guru

Guide: Wiring Spotlights to switch
Here's a short guide on how to wire some spotlights to the rear of your 4wd.
I used a spotlight kit from Super Cheap Auto. It cost me $80 and it came with almost everything I needed. There wasn't enough cable or connectors for the wires so I bought 2 more reels of wire and an economy kit of wire connectors. You don't have to use 2 spotlights, in fact, 1 spreader light probably works better for reversing but I plan on adding a swivel joint to these lights so I can use them as work lights in the future.
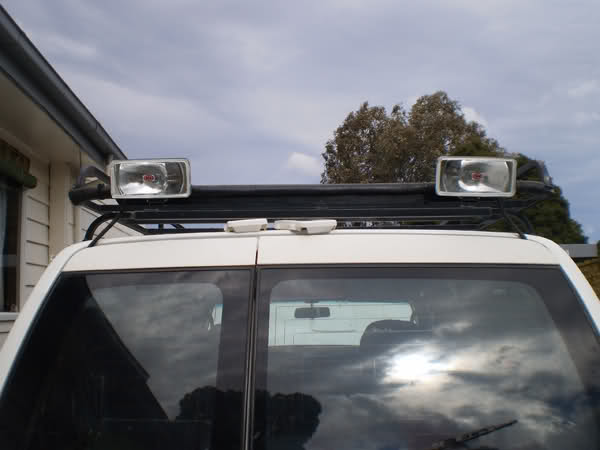
Here is the finished result in the day light. I drilled a couple of holes through the roof rack and the lights simply bolt through them. The only movement I have right now is up and down. Cables are run through 2 holes, 1 in each corner behind the barn doors. I popped the small plug out and drilled them bigger to fit the wires through. Ideally, you will want to buy some rubber grommets to put in the holes.
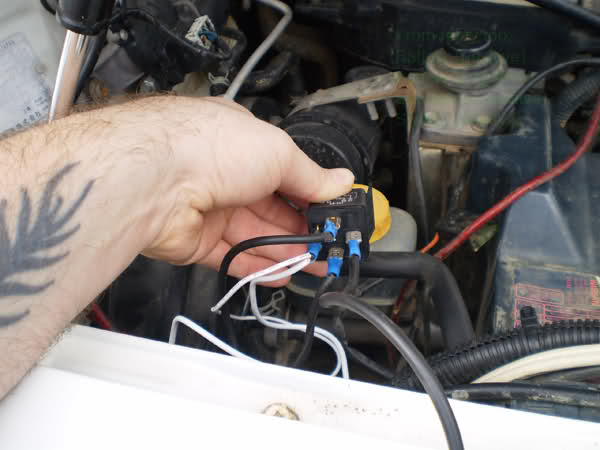
This is the relay supplied with the lights. I'd never wired a relay before and I didn't realise the instructions were on the box.  Once I read the diagram, it was straight forward.
A brief description:
White leads are the positive wires from the spotties.
One black wire goes to the positive connection on the switch.
One black lead goes to the positive terminal on the battery.
One black lead goes to the negative terminal on the battery.

One black lead also goes from the accessories connection on the switch, straight to the positive on the battery -it doesn't go through the relay. This is so I can switch the lights on and off whenever I like, rather than needing the high beams on like spotties fitted to the front.
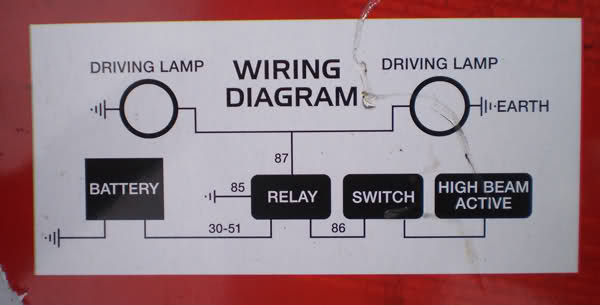
Self explanatory. These are the instructions from the kit. A brief run down for those not too great at reading diagrams.
Spotlight negative wires go to an Earth.
Spotlight positive wires go to the Relay.
From the Relay, run a wire to Earth.
From the Relay, run a wire to Switch.
From the Relay, run a wire to positive battery.
From the Battery, run a lead from negative terminal to car body. (already done) 
From the Switch, run a wire to a 12v source. (I went to the positive battery terminal)
Spot lights at night WITH a camera flash. You can see where the lights are angled. The flash also knocks out all of the "glow" from the spotties and it looks pretty crap.
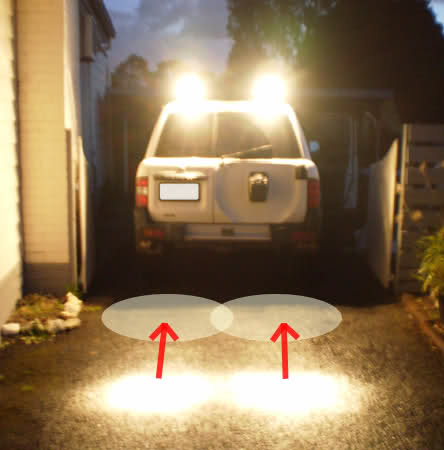
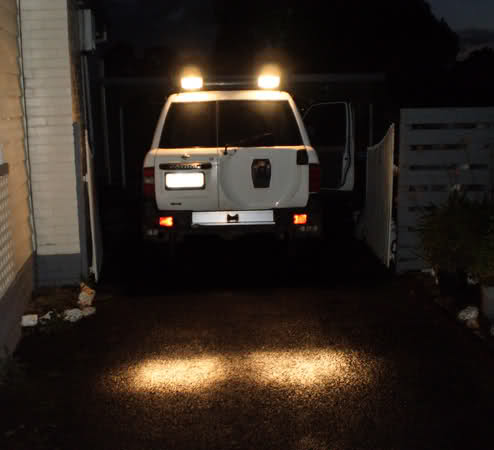
No flash this time. There is still a definite spot light on the ground but also it lights up the entire rear of the car. I have angled my lights down to bring the spot lights on the ground closer to the car, as per pic above. The arrows represent where the light appears on the ground.
And that's it. It took me 1.5 days but it should have taken me a day or maybe a bit less. I also redid all of my connections having finished the first time and also replaced my battery terminals with other ones I found which had better anchor points for accessory connections.
The switch is located in one of the black buttons running down the armrest console on the passenger side. I have it so that DOWN is off and UP is on. I did this because I quite often throw my jacket or bag on the front seat and I didn't want it hitting the switch and turning the lights on, especially during the day when I wouldn't know.
Lastly, I will be changing the switch to a smaller silver one. I will also make the lights swivel so they can point out to the side of the 4wd.
-
The Following 16 Users Say Thank You to Timbo For This Useful Post:
big_fletch (9th July 2011), Clunk (9th July 2011), Dave_H (2nd July 2015), Finly Owner (11th September 2010), G-ForceCrew (9th July 2011), Jock (14th April 2012), Majestic (1st November 2014), Matchbox (22nd June 2014), Mazodude (2nd December 2011), Mojo01 (6th May 2012), my third 256 (5th December 2011), oncedisturbed (11th February 2012), Rirz (2nd April 2016), SonOf (16th July 2013), Ted (21st April 2011), tinkabell (4th May 2015)
-
17th August 2010 09:20 PM
# ADS
Circuit advertisement

-
17th August 2010, 09:38 PM
#2
Administrator

Great post G, thanks for the detail.
Glad you sorted out the Pin Accessories too! Electrics can be confusing at times.
Agree on the swivel too G.
-
-
8th October 2010, 06:50 PM
#3
Expert
.jpg "Chops's Avatar")
Nice one Tim, great detail. Do those wires go through the rubber door seals, as in from the outside to inside, or just run along the outside. If they run over the seals, wouldn't you get water running down the wire entering the vehicle.
1984 MK Anniversary Model, LWB,SD33,Air-Con,P/S,Straight Body,Minimal Rust.........Not Bad For Free
-
-
23rd November 2010, 01:39 PM
#4
Patrol Guru
Wow, here's a late reply! Sorry about that chops.
There are two small holes in the top corners of the door frame of the rear doors. I drilled them out a bit larger to fit the cables.
There's 3 ways I can think of that will stop water down the wires and inside the holes.
1. Fitting rubber grommets usually gives a pretty good seal. You should be able to fine one that is a tight fit for the cables running through it.
2. Clear Silocon would also work. Wet your finger, put some on the end of it and neatly smear it around the hole and the cable. This will keep water out.
3. Simple gaffer tape. This is what I have temporarily until I get some grommets or settle on silicon. I just simply used tape to cover it up and it works fine. I've had some heavy rain on the patrol here in Melb and it's still very dry. It's a crude way of doing it and I don't recommend it but it's been holding for quite a while now.
Last edited by Timbo; 23rd November 2010 at 10:44 PM.
-
-
23rd November 2010, 09:33 PM
#5
Expert

well done mate great bit of info
-
-
21st April 2011, 12:14 AM
#6
thanks mate great post, will be doing mine next weekend
-
-
9th July 2011, 07:22 AM
#7
Advanced

Hi Guys,
Just a note is to remember to fuse any power (+) connections you take directly from your battery. Electrical fires can do so much damage. Hope this helps to.
Kel
-
The Following User Says Thank You to G-ForceCrew For This Useful Post:
-
9th July 2011, 10:19 AM
#8

Originally Posted by
G-ForceCrew

Hi Guys,
Just a note is to remember to fuse any power (+) connections you take directly from your battery. Electrical fires can do so much damage. Hope this helps to.
Kel
Excellent point Kall & thanks for bring ing it up.
-
-
10th July 2011, 03:19 PM
#9
Patrol Guru

OK, I have edited this post by deleting the wiring diagram.
On advice I accept that the wiring diagram was one that you should not use.
Last edited by TimE; 19th April 2012 at 03:00 PM.
Reason: Not to standard wiring diagram
Time Marches On .....and on ..... and on
-
The Following User Says Thank You to TimE For This Useful Post:
MudRunnerTD (19th April 2012)
-
10th July 2011, 03:27 PM
#10
Not the way I'd do it but yeah it would work none the less.
-


 Reply With Quote
