OUR VIDEOS GALLERY MEMBER SPONSORSHIP VENDOR SPONSORSHIP

User Tag List

Page 1 of 2 12 LastLast
Results 1 to 10 of 12

Thread: rebuild y60

  1. #1
    Beginner
    Join Date
    May 2015
    Posts
    9
    Thanks
    0
    Thanked 12 Times in 4 Posts
    Mentioned
    0 Post(s)
    Tagged
    0 Thread(s)

    rebuild y60

    Hello

    Here is the complete rebiuld off my 1991 y60.

    I own it for a few years now

    this is when i bought it


    this is what it looked like 1 year before i starded the rebuild


    But the rust bug got to it a bit and it needed a rebuild


    so i got a other body from a friend in France


    and took it home


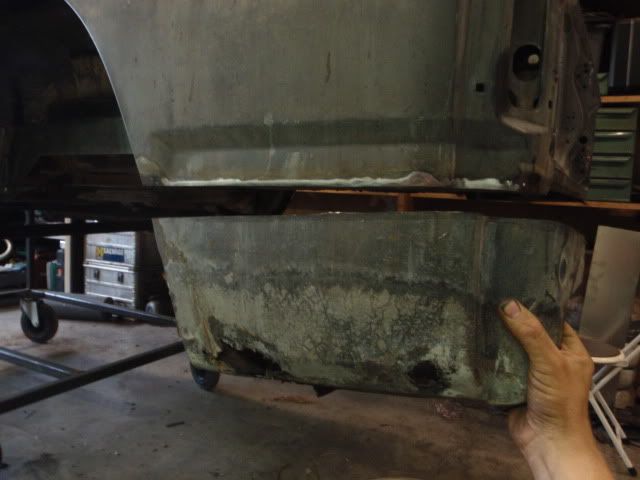
    Stripped it completey and had it dipped in acid to strip the body of al it's paint.
    So i had bare meteal to work on.


    this body also needed work on rust spots but it was much better then mine.


  2. The Following 4 Users Say Thank You to jan145 For This Useful Post:

    NissanGQ4.2 (6th May 2015), Parksy (4th May 2015), Rossco (4th May 2015), skiman (13th May 2015)

  3. #2
    Patrol Freak Parksy's Avatar
    Join Date
    Jan 2013
    Location
    Nowra NSW
    Posts
    1,592
    Thanks
    963
    Thanked 843 Times in 523 Posts
    Mentioned
    5 Post(s)
    Tagged
    0 Thread(s)
    Very nice! Keep the pictures coming. Love these kinds of threads.
    IMO and should be taken with a grain of salt.

  4. #3
    Legendary Rossco's Avatar
    Join Date
    Jun 2010
    Posts
    4,599
    Thanks
    10,432
    Thanked 7,123 Times in 2,794 Posts
    Mentioned
    200 Post(s)
    Tagged
    0 Thread(s)
    Quote Originally Posted by Parksy View Post
    Very nice! Keep the pictures coming. Love these kinds of threads.
    Yeah definatly. Would love to do a full rebuild of my old GQ, probably will never happen tho.

    Be heaps of fun I reckon.

  5. #4
    Beginner
    Join Date
    May 2015
    Posts
    9
    Thanks
    0
    Thanked 12 Times in 4 Posts
    Mentioned
    0 Post(s)
    Tagged
    0 Thread(s)
    the story continus

    I got cut out fender flares from Iceland


    test fitted the massive flares and cut out the fenders


    made a hood scoop


    I wanded to make a hydro asised steering like i had seen in Iceland. But before i started building some thing i wanded to know how powerfull the steering allready is. So we tested it. And it lifts 700kg off stones with the tierod.


    then modified a steeringbox to prvide oil for the extra cilinder


  6. The Following 2 Users Say Thank You to jan145 For This Useful Post:

    NissanGQ4.2 (6th May 2015), Parksy (9th May 2015)

  7. #5
    Beginner
    Join Date
    May 2015
    Posts
    9
    Thanks
    0
    Thanked 12 Times in 4 Posts
    Mentioned
    0 Post(s)
    Tagged
    0 Thread(s)
    and more

    Fitted a custom made cilinder to the tierod.


    i had to grind a bit of the diff carrier to fit the cilinder.


    Test drove the setup with the cilinder and liked it. The car is more resposive to steering corrections and lest wheel wobbel.

    after the test i could take the old body off and start on the frame.


    the frame was in a bad chape. A lot off rust and cracks.


    the frond off the frame was ok but the back realy bad.
    So i welded it on a subframe


    and cut the back off


    got a good backend from a short wheel base


    and welded that back on


    sandblasted and welded plates in for more strength


    got new tires from the usa. 18/14.5/17


    new wheels (17x10) from Arctic trucks iceland.
    they needed to be machined because they are fore a toyota hilux and the centre is not big enough
    because a new hilux does not have big hubs.


    the new body in the paintshop

  8. The Following User Says Thank You to jan145 For This Useful Post:

    Parksy (15th May 2015)

  9. #6
    Beginner
    Join Date
    May 2015
    Posts
    9
    Thanks
    0
    Thanked 12 Times in 4 Posts
    Mentioned
    0 Post(s)
    Tagged
    0 Thread(s)
    Now continue

    fitted custom cilinder to the tierod and made a testdrive.
    The patrol was much more resposive to steering and less wheel wobble


    after the test drive i took the body off.


    The back off the frame is in a bad chape


    so i welded a sub frame to the frame


    and cut the back off and cleaned the inside off the frame


    got a good back off a shorty


    and welded this back on


  10. #7
    Rotaredom NissanGQ4.2's Avatar
    Join Date
    Aug 2010
    Location
    Lower Blue Mountains
    Posts
    10,647
    Thanks
    6,068
    Thanked 4,892 Times in 3,239 Posts
    Mentioned
    17 Post(s)
    Tagged
    0 Thread(s)
    What a thread, looks good mate, keep the updates coming
    Time is never wasted when your wasted all the time


    WARNING: Towballs used for recoveries can, and do kill people and damage property.

  11. #8
    Expert skiman's Avatar
    Join Date
    Apr 2015
    Location
    Fern Bay NSW
    Posts
    110
    Thanks
    72
    Thanked 95 Times in 49 Posts
    Mentioned
    0 Post(s)
    Tagged
    0 Thread(s)
    OMG that is epic. What I would give for a smidgeon of your talent! Thanks for sharing mate, outstanding work!

  12. #9
    Beginner
    Join Date
    May 2015
    Posts
    9
    Thanks
    0
    Thanked 12 Times in 4 Posts
    Mentioned
    0 Post(s)
    Tagged
    0 Thread(s)
    wright where was i

    Frame reinforced, hot dip gavinaised and all brake and fuel lines made from coper.


    frond axle from a y61 with 4.88 gears from marks 4wd, and new bearings. The spring mounts
    have moved 3cm up. Axle housing is poudercoated, brake lines are coper.


    rear axle is still a y60 with 4.88 gears and a factory locker, the vacum lines for this are now also coper.
    all 4 trailing arm mounts are moved up 12cm so they sit more leavel and give a beter ride. Spring mounts are moved up 5cm and the shock mounts are 5cm shorter. Axle housing is poudercoated. The old fuel tank made way fore a new long range tank.


    bought a really nice exhaust manifold on ebay ,it cane from England.


    I got the body back from the paint shop. Started on the interior, a bulk head for the dutch registation becaus it is registrered as a light commercial cargo truck. Made a place fore the tools ,compressor ,oil and other things. Got the amplifier for the sterio and a big 220v inverter.


    Got the wiring in and some sound proofing. Dasch is in color and has a landcruiser consol in the midle.


    led interior light by ikea


    a big momend


    The big flares mounted and the sun visor

  13. #10
    Advanced Roess's Avatar
    Join Date
    Mar 2015
    Posts
    59
    Thanks
    14
    Thanked 101 Times in 34 Posts
    Mentioned
    0 Post(s)
    Tagged
    0 Thread(s)
    now this is what i call a real restoration! i am doing it as well but in a much lower grade than this! it is really funny to see the effort you have in this car! really impressive!
    Kind Regards
    Roesen - Norwegian style

Page 1 of 2 12 LastLast

Posting Permissions

  • You may not post new threads
  • You may not post replies
  • You may not post attachments
  • You may not edit your posts
  •