It's all stuck on now ....... I won't be re-doing it!Originally Posted by P4trol


It's all stuck on now ....... I won't be re-doing it!
2006 4.2TDi ex-Telstra Remote area Camper. Patrol Sold after 11 years of ownership Replaced with 2006 OKA NT Expedition Truck. Cummins, Allison & lots of goodies
A Nomadic Life (Blog)
I reckon it looks better without the black caps.
2006 4.2TDi ex-Telstra Remote area Camper. Patrol Sold after 11 years of ownership Replaced with 2006 OKA NT Expedition Truck. Cummins, Allison & lots of goodies
A Nomadic Life (Blog)

Looks good Cuppa, much better without the black caps.
Wish I could do the same but have a air bag in the way.
Just remove it with a hammer!!!!
TPC (29th May 2013)


Before you go to much further what about internal LED light of some description.
Looking good BTW
Its a glove box and probably closed 90% of the time, wouldn't be worrying about black caps.
Maybe consult YsL
Last edited by threedogs; 29th May 2013 at 02:22 PM.
04 ST 3lt auto, not enough Mods to keep me happy, but getting there
Understatement!
But with your help & an ingenious way to get the holes in the right place I'm getting there. The 'door' is hinged on & sitting quite nicely, but I can't really do any more until the box is secured in place, which needs the USB socket which I bought off ebay to first be installed. I'm waiting for the postman to deliver it.
Having cut the hinges as per Mudski, I ended up deciding not to use them. I was going to but my method of determining the hinge hole position in the dash convinced me that a pair of self tapper screws would do just as good a job. The hardest part was working out where to drill the two holes in the 'door'. Clearly they needed to be absolutely symmetrical, but determining the position was basically guess work. Having the 'tabs at the bottom corners of the aperture in the dash made the job more difficult as with my head in the position of the original glove box, looking up at the inside of the new 'door', those bloody little tabs obscured my view. In the end I drilled one hole in the 'door' & then stuffed around with vernier callipers for a while in an attempt to match the position on the other side of the door. Whoever said that this job was easy was over stating their case! It's damned hard & stressful & in my case done without the soothing effects of beer!
Anyway I was smart enough to drill those two holes with the the smallest drill bit I had, a 2mm one, based on the thought that if I stuffed up, at least I'd probably get a second go. It was fortuitous that the 2mm holes were just the right size to allow the shaft of some 1/8th rivets to poke through. To determine the hole position in the dash I first sharpened the ends of the rivet shafts to a point on my bench grinder & then pushed them through the holes. With the points poking through the holes I then dipped each point into a tube of engineers blue, just a tad, & then withdrew each rivet until the point was just hidden. Once the 'door' was in position on the dash I was able, from inside, to push each sharpened pin against the dash & withdraw it, leaving a tiny blue spot. The point prevented the 'blue' messing up the dash (It would be hard to remove). I then drilled two 2mm holes in the dash, & used the (now wiped clean) rivets to poke through, creating temporary hinges, to evaluate my work, with which I was pleased to say "YES! you little beauty" aloud to myself.
Of importance was the fact that at this point the lower section of the door had NOT been trimmed, this allowed it to sit as Mr Nissan had intended. I later trimmed it, & the top lip, as per Mudski's instructions. The holes have now been enlarged to 4.8mm diameter, just fractionally bigger than the self tappers I've used. The holes in the dash are smaller to ensure the screws go in tightly, so that the srews don't turn as the 'door' is opened & shut.
Talking of Mudski's instructions, I am still kicking myself for not re-reading them before attacking the inside of the 'door' with the angle grinder. I should have left it, I was tired & weary, just the right scenario in which to make silly mistakes, & yep, I made a silly mistake. Mudski cut off all the plastic 'mounting posts' except one, which he left to mount the magnet for the latch on. I cut them all off, & then cursed ..... loudly. I am hopeful that I can build up a base to fix to the inside of the door with adhesive, but the inside is roughened from the angle grinder so I'm not certain that loctite 406 will work. I have been experimenting with various adhesives on the bits of dash from when I cut the hole, but I'm not totally certain that it is the same pastic as that used in the 'door'. If worst comes to the worst I'll use epoxy to attach a piece of timber & some carpet attached with contact adhesive to reinforce it. Having been learning a lot about polyolefins & the difficulty in in gluing them!
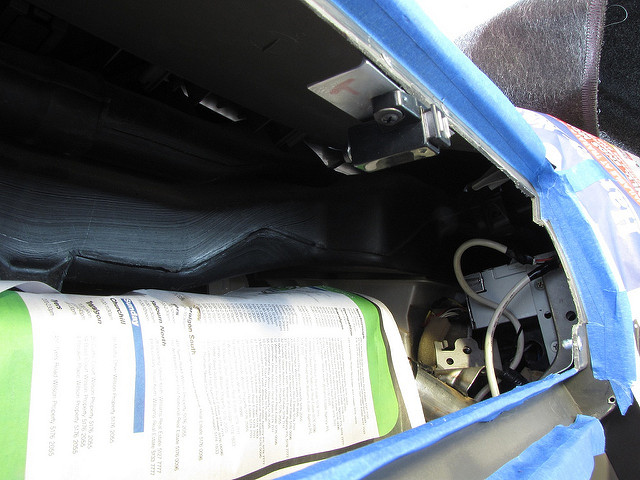
I have attached the 'push to open' catch directly onto the dash using a piece of aluminium angle with the 90 degree angle reduced in the vice to get the catch sitting at the correct angle. it is temprarily held in place with small self tappers at the moment, but will be riveted & glued eventually. The temporary setup has allowed me to 'test run' the catch & all seems lined up reasonably well.
Am now waiting on the postie before I can do any more.
Cuppa
2006 4.2TDi ex-Telstra Remote area Camper. Patrol Sold after 11 years of ownership Replaced with 2006 OKA NT Expedition Truck. Cummins, Allison & lots of goodies
A Nomadic Life (Blog)
FNQGU (17th January 2014), GrumpyOldFart (30th May 2013)
Epic post, but the progress pics didn't attach...
LOL
Just the epic post this time. ...... no pics of my mistakes or stressed facial expressions!
Cuppa
2006 4.2TDi ex-Telstra Remote area Camper. Patrol Sold after 11 years of ownership Replaced with 2006 OKA NT Expedition Truck. Cummins, Allison & lots of goodies
A Nomadic Life (Blog)
Well my 2nd glovebox is now finished & once again I thank Mudski for the inspiration & confidence his write up gave me. As is obvious from my pics I didn't copy him ...... instead I made the job rather more difficult for myself. In fact I'd say it is probably the hardest thing I've done in my Patrol's fit out to date, mainly because as Mudski so eloquently stated in his opening line of this thread "
Unlike most other jobs I've done on the vehicle, there are several points during the glovebox install where you don't get a second chance & if things do indeed turn to poo, it would be fairly deep!if you stuff it up it will turn to poo!
However I managed to come through smelling of roses rather than sh*t.
A few more pics:
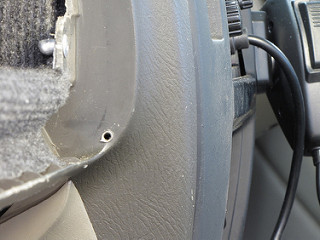
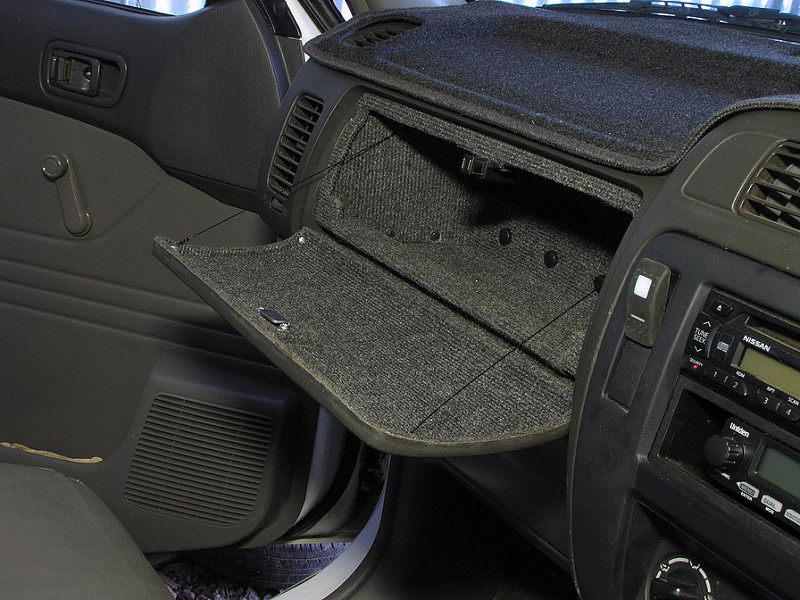
A detail shot showing how close to the edge the 'hinge' hole in the dash is.
The 'push to open' magnetic latch mounted on aluminium angle which was 'closed up' a bit in the vice to get the latch sitting at the right angle. It works, but time will tell if the magnet is strong enough to hold the door shut on bumpy roads. I suspect I may have to add another magnet & adjust, but for now it works as it should. The pic shows the latch & it's mounting plate attached to the dash with a couple of small screws. Once I had determined the correct position of the latch that it was working correctly I attached the plate with glue & a couple of rivets. The rivets have a lower profile than screws & don't show under the carpet which was stuck over them. The actual latch can still be removed with a stubby phillips screwdriver.
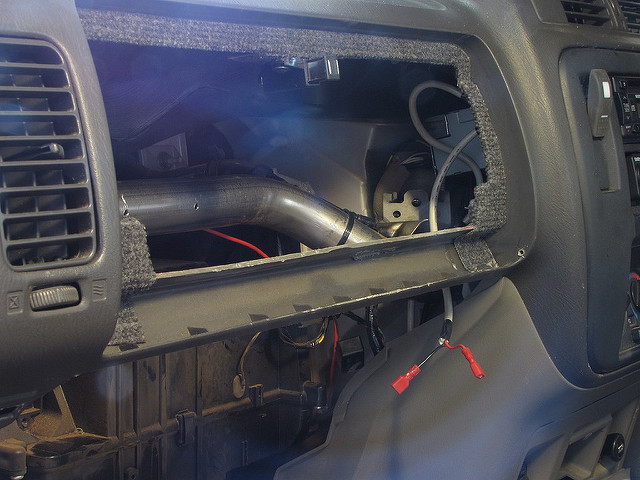
The fascia was carpeted separately to the box except at the bottom.
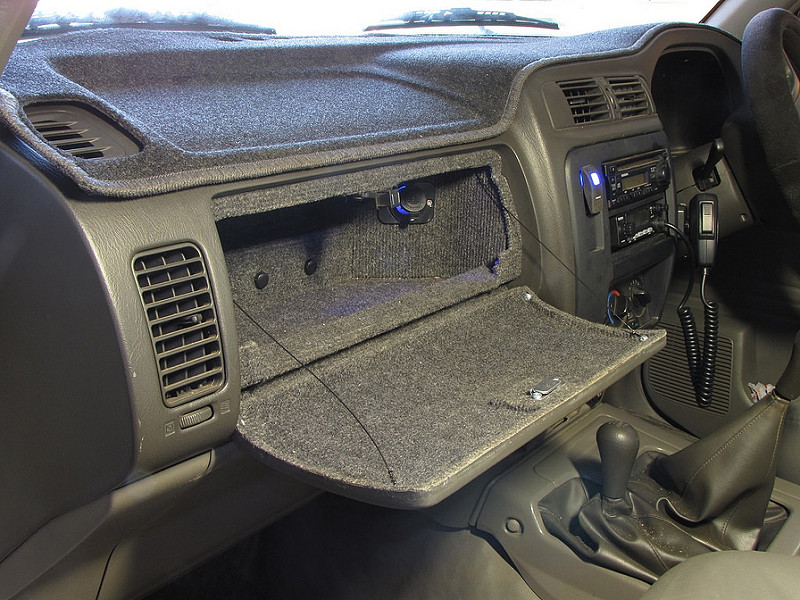
And now................. drum roll
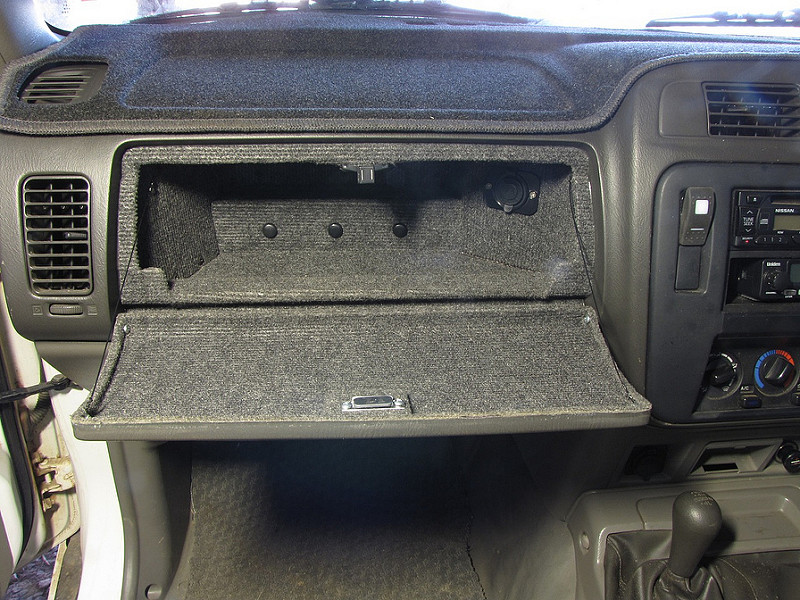
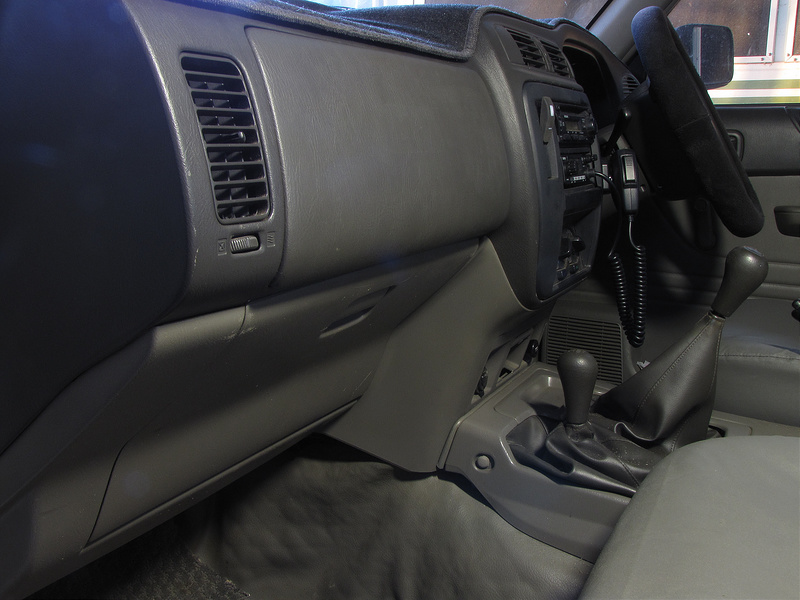
Tadaa! The finished item ......yay!
When closed the door sit's out slightly on the top right corner, but only a tad & I can live with that.
Overall I'm pleased with my efforts, but am glad it's over and done.
Cuppa
2006 4.2TDi ex-Telstra Remote area Camper. Patrol Sold after 11 years of ownership Replaced with 2006 OKA NT Expedition Truck. Cummins, Allison & lots of goodies
A Nomadic Life (Blog)
FNQGU (17th January 2014), mudski (19th July 2013), NissanGQ4.2 (18th August 2013)

AWESOME job Cuppa!
 Posting Permissions


 Reply With Quote