-
25th May 2015, 09:38 AM
#31
-
-
25th May 2015 09:38 AM
# ADS
Circuit advertisement

-
25th May 2015, 04:49 PM
#32
-
-
25th May 2015, 09:47 PM
#33
Patrol Guru

Haha nice work Skiman! Although it must be the day for it as my last bits turned up today.
Cheers Rod
_______________________________________________
Bitumen ...... Another watse of public funds
My Build 2005 TD42TI
-
The Following User Says Thank You to Rocket55 For This Useful Post:
-
27th May 2015, 06:17 PM
#34
-
The Following 2 Users Say Thank You to skiman For This Useful Post:
AB (27th May 2015), LaughingBeagles (30th May 2015)
-
28th May 2015, 08:01 PM
#35
Expert


Gauge install continues this afternoon. Slowly but surely!
Today's mission - splice in the dimmer switch wires and mount the programmable push button screws to the pilllar pod.
4 bolts and a screw to get the bottom plastic shroud off.
04PcHiz.jpg
Next was the right hand side shroud with the dimmer switch in it. This pulls off with a little pressure from the bottom. Then it's a case of pulling the instrument cluster shroud out a little and then pulling the rest out.
5bwlvcz.jpg
Here are the two wires I need to splice into to make the Redarc gauges dim. The blue wire and the pink wire.
cqNqG3c.jpg
I've never done this before, so an autoelec will probably roll over in his grave somewhere. Watched a youtube vid and seemed like the best way to go. Cut the wire, add some heat shrink, wrap the wires longitudinally for mechanical strength, do the same with the wire to be spliced in, solder, check continuity, heat shrink.
tc0dAzc.jpg C7giIf4.jpg ufCMiNj.jpg SQODEtl.jpg
Be patient with solder so that it gets good flow and a shiney solder joint. Don't overheat, don't mess with it while it's 'wet'. Clean it afterwards. Heat shrink over the top, rinse repeat for the other side. I moved the joint higher on the pink wire so that the terminations wont be on top of each other.
e6p3zhs.jpg
Check continuity from the plug terminal to the end of the wire on your splice connections to make sure you have good electrical connection. Then pray that it all goes back together like it was at the beginning! lol
NpXBeSE.jpg
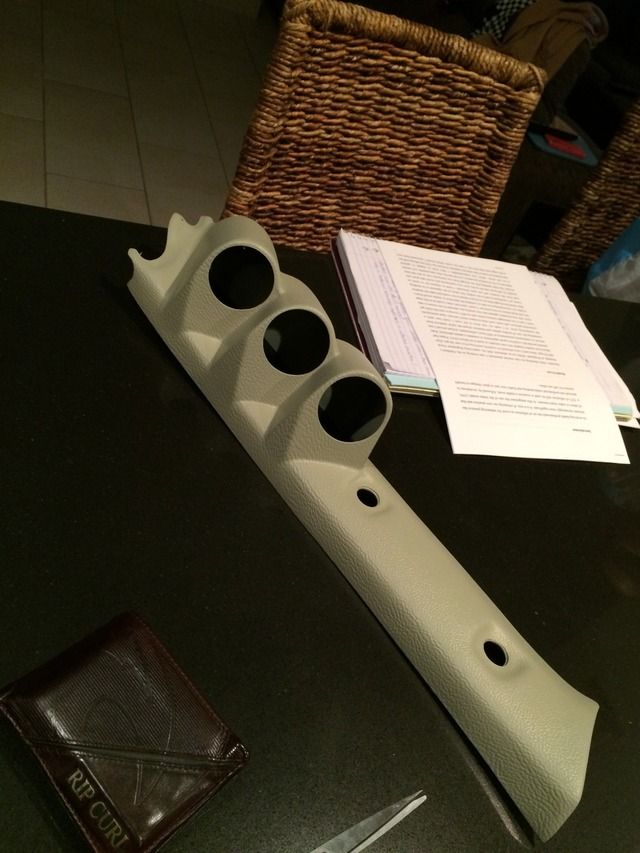
Lastly, i drilled two 7mm holes for the gauge switches into the pillar pod.
GcQu4Bu.jpg
This whole gauge install seems like a big job, and it probably is... but one little patient step at a time and ill likely save a couple hundred dollars visiting an auto elec, and learn something new!

Last edited by skiman; 28th May 2015 at 08:07 PM.
-
The Following User Says Thank You to skiman For This Useful Post:
LaughingBeagles (29th May 2015)
-
28th May 2015, 09:43 PM
#36
Patrol Guru
Nice work mate! Some good pics I can follow when I get around to doing mine.
You're becoming quite proficient at this stuff now, soon there'll be no stoping you 
-
The Following User Says Thank You to Rocket55 For This Useful Post:
-
28th May 2015, 10:06 PM
#37
-
The Following User Says Thank You to skiman For This Useful Post:
-
29th May 2015, 07:08 AM
#38
Expert

Great stuff Skiman, easy to follow mate. Thanks a bunch.
Looking for a 4WD Club in WA that caters solely for Patrol, Safari and Maverick owners? Click here to HERE to visit the Western Patrol Club. Click HERE for the Beagle Mobile Mods!
-
The Following User Says Thank You to LaughingBeagles For This Useful Post:
-
30th May 2015, 12:28 AM
#39
Expert

We'll done ski man!! Very well put together!! Just out of interest did your gauges go straight into the holes of your pillar mount? How well does your pillar mount actually mount? Do the holy shit handle holes line up? Only reason I ask is I used a double pillar mount from the same company & figment was pretty terrible!! Colour match was also pretty bad!! But at the end of the day nothing a Stanley knife won't fix & it is cheap so can't complain too much!! But just curious if you had to sand & trim or if everything just fit like it should of? Cheers mate!
2006 GU IV ST MAN 3.0TD - UHF, Boost & EGT Gauges, NADS, Pro Vent 200, Snorkel, Tigged IC, 2" Lift, Dual Battery System & Still lots to come!
Got a Patrol in WA
CLICK HERE - Just Go There!
-
-
30th May 2015, 08:55 AM
#40
Expert

Originally Posted by
Dman2603

We'll done ski man!! Very well put together!! Just out of interest did your gauges go straight into the holes of your pillar mount? How well does your pillar mount actually mount? Do the holy shit handle holes line up? Only reason I ask is I used a double pillar mount from the same company & figment was pretty terrible!! Colour match was also pretty bad!! But at the end of the day nothing a Stanley knife won't fix & it is cheap so can't complain too much!! But just curious if you had to sand & trim or if everything just fit like it should of? Cheers mate!
Thanks mate. I've only trial fitted the gauges into the pod. One was a tight interference fit and needed some manipulation to get in (but it stayed there when fitted), the other was loose and just slid in. The loose one will need some way to anchor the gauge in the hole... maybe a little Sikflex around the inside edge. Trim colour matched seemed ok at a glance and I havent tried fitting it with the grab handle yet - hopefully today. Will post an update as I progress. I have a full weekend to myself so hoping to make solid headway. Thanks for stopping by mate! 
-
The Following User Says Thank You to skiman For This Useful Post:


It's not without the pucker factor i assure you lol.


 Reply With Quote